Editing Color Channels
![]() This set of actions is intended as a substitute for the missing Channels palette. It lets you edit the Red, Green, and Blue color channels individually. To use it efficiently, bear in mind the three sets of complementary colors: "Cyan - Red", "Magenta - Green", and "Yellow - Blue".
This set of actions is intended as a substitute for the missing Channels palette. It lets you edit the Red, Green, and Blue color channels individually. To use it efficiently, bear in mind the three sets of complementary colors: "Cyan - Red", "Magenta - Green", and "Yellow - Blue".
Any tonal adjustment of a color channel alters the correlation between its primary and complementary color. That is, lightening a channel increases the amount of the corresponding primary (red, green, or blue) color, while darkening it adds the complementary (cyan, magenta, or yellow) color.
For local color corrections, we may pre-define some area with a selection tool. Moreover, we can paint on a color channel with white, black and grayscale colors. As a rule though, pure lightening and darkening works much finer.
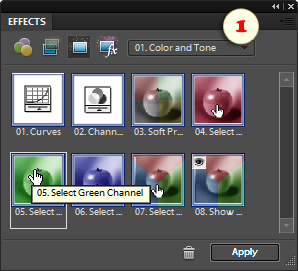
 For example to adjust magenta, you double-click the "Select Green Channel" pictogram in the "Effects" palette. Now the selected channel is displayed as a grayscale image; the Red and Blue channels disappear.
  Double-click the "Show Hidden Channels" command. Now all the three color channels are visible and you can see the composite image. Nevertheless, only the "Green" channel is currently active.
 - Use any tools or commands to darken the selected channel. For example, on the sample image, the author has darkened the Green channel on the lips with the Burn tool.
- If necessary, select and edit another color channel. For instance, on this screenshot, the author lightens Blue channel on the eyes with the Dodge tool.
 After editing color channels, double-click the "Select RGB Channel" command in the "Effects" palette. Now you can resume editing of the composite image.
Please keep in mind that in a layered document, you select and edit color channels only for the current layer. By choosing any other layer, you automatically switch to the RGB (composite) channel.