 This set of actions loads to a selection the luminosity of either the entire image or its individual color channels.
 "Select Luminosity" is the most popular command in the kit. By double-clicking its thumbnail in the "Effects" palette, you load the luminosity of the RGB channel, that is "of the composite image" or "of all visible layers". To ignore the luminosity of certain layers, just hide those before applying the effect.
As result, image areas get selected proportionally to their lightness. You may use it, for example to extract line art from a scanned drawing: just select white paper and then delete or mask it. (That's how "Hide Image Luminosity" works.)
On the contrary, to select darker areas of your image, you load luminosity and then invert the selection (Select > Inverse). Sometimes, it's the only way to extract, e.g., soft shadows from a light background.
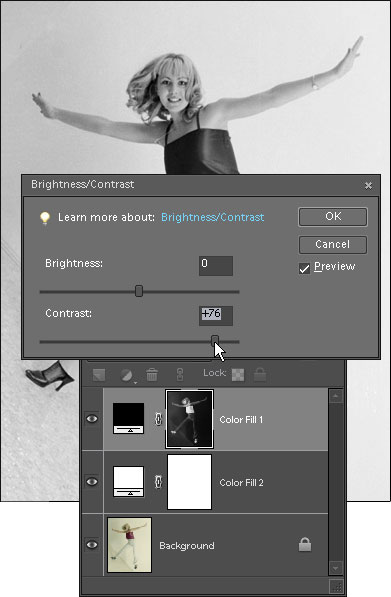
Furthermore, you may use this command for B&W conversion as shown on this screenshot:
- Load image luminosity.
- Invert the selection.
- Create a black fill layer (Layer > New Fill Layer > Solid Color). The selection converts to a layer mask.
- Hide the previous image by creating a white fill layer behind the black one.
- Adjust the mask contrast (Enhance > Adjust Lighting > Brightness/ Contrast).
In some cases, you may want to select the luminosity of an individual color channel. Again, hide in the Layers palette the layers you don’t need, and then double-click the "Load Red Channel", "Load Green Channel", or "Load Blue Channel" thumbnail.